Understanding Notifications
A Insights subscription provides you with the ability to enable notifications for managing your event broker services. Insights uses a central monitoring service (Datadog , which is a third-party software provider) to:
- collect metrics through the use of Datadog agents on the event broker services
- send notifications for that occur on event broker service that are tracked via monitor events that are triggered. For information about what is monitored, see Insights Monitors for Datadog Reference.
By default, notification emails are not enabled. After you enable notification emails, you can configure specific individuals, groups of individuals, or integrate with third-party applications to receive notifications. Furthermore, you configure who receives the notifications based on the severity level of the email notification.
For information about :
- email notifications, including severity levels and emails, see About Email Notifications and Severity Levels
- how to configure emails to receive notifications from Insights, see Managing Notifications
About Email Notifications and Severity Levels
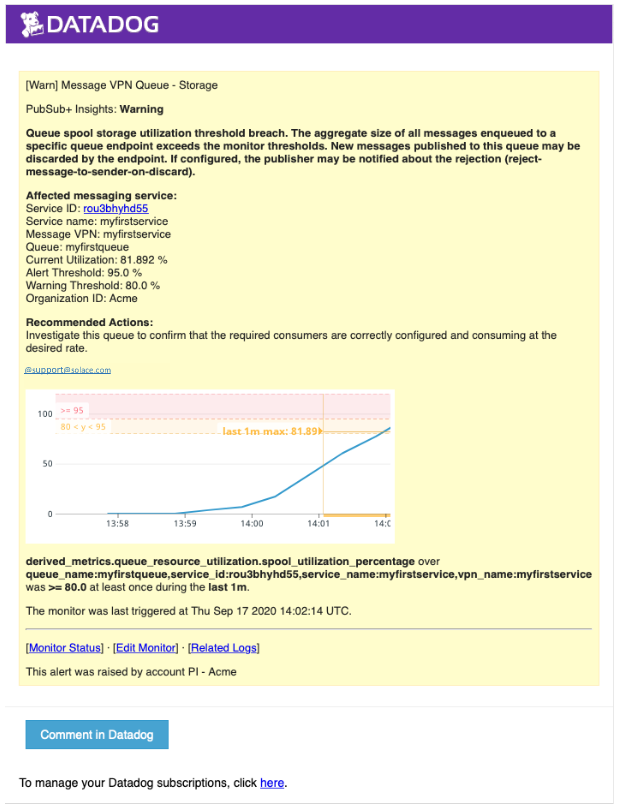
When email notifications are enabled, emails are sent that may contain some useful information such as:
- the name of the monitor
- the issue
- a description of the problem
- recommended action (if applicable)
- the severity; for more information about severity levels, see Severity Levels of Email Notifications
- time and date of the problem
- details of the affected event broker service (service name, organization, current threshold)
- links to related logs (if applicable)
When logs are available, some of the information list above is in the log itself rather than in the email.
The links in the notification email are only accessible if the user has been granted the Insights Advanced Manager, Insights Advanced Editor, or Insights Advanced Viewer role in the account for
Emails can be sent to the an individual, a group of people, or to an application. For more information on the differences, see Types of Emails.
Here's an example of the notification email with the severity level of Alert when the Queue for Guaranteed Messages rises above 95% of the capacity:
Types of Emails
Email notifications can be sent to an individual user, a group users, or a third-party notification-based applicatios (application email integration). The three types of email addresses you can use are as follows:
- Individual — This email would be one person, such as person1@example.com.
- Group — This email is sent to an email server that distributes the email to multiple people. For example, help@support.sap.com.
- Application —This email that is used to integrate with a third-party application. Typically these applications are notification-based platforms take the email notifications and turn them into incidents to consolidate and centralize notifications with an organization's workflows or notification systems. For example, may receive a text message, pager notification, assigned a ticket, etc. For more information, see Integrating Notifications with Applications.
Severity Levels of Email Notifications
The email notifications are sent based on the three severity levels and are triggered based on the configured monitor event. For information about monitor events, see Managing Notifications.
The s severity levels are as follows:
- Alerts — The highest severity of monitor events related to resource utilization or service interruptions. This notification indicates that the specified threshold as a percentage (e.g., 95%) of the available capacity has been reached; alternatively, it can also indicate that a status change has occurred. Some alerts often indicate a serious error where event broker services are about to be unavailable or non-operational. When an alert notification maps to this threshold level, action should be taken to remediate the issue as a service interruption may have occurred or may soon occur. When a log is received, the event occurred; a threshold of say 95% indicates the a service interruption is about to occur.
- Warning — A lower-level severity of monitor events related to resource utilization or service interruptions. This notification indicates that the specified threshold as a percentage (e.g., 80%) of the available capacity has been reached; alternatively, it can also indicate that a status change has occurred as indicated by a log. These notifications often indicate a more serious problem may or is about to occur if action is not taken.
- Recovery — Recovery notifications follow when the related Alert or Warning notification favorably changes status or drops below a threshold. For example, if you had received an Alert that indicated that the metric level had reached 95%, you'll get a corresponding Recovery notification when the metric level goes back below 95%. For alerts and warnings notifications that are created due to a status change as indicate by a log, a CLEAR log event would have been received.
The standard notifications are grouped into the following categories and utilize these Insights monitors:
For more information about the Insights monitors, see Insights Monitors for Datadog Reference.
Managing Notifications
Notification emails are not enabled by default when you first subscribe to Insights. You must enable your account to receive notifications. In addition to enabling your account to receive email, you can disable it or change the email addresses that notifications are sent to. You can also see the length of time that logs are retained.
The email notifications that you received are based on monitor events that are triggered based on the configured thresholds set for a monitor or a specific log that is received. For more information about the threshold levels for monitor events, see Insights Monitors for Datadog Reference.
For more information about managing monitoring and notifications, see the following sections:
- Enabling Notifications for Your Account
- Changing the Emails for Your Account
- Disabling Notifications for Your Account
- Viewing the Log Retention Period
Enabling Notifications for Your Account
To start receiving notifications, you must enable it for your account. You must have an Insights subscription, and be an Organization Administrator to perform this procedure.
Follow these steps to start receiving notification emails to one or more email addresses:
-
Log in to the Cloud Console if you have not done so yet. The URL to access the Cloud Console differs based on your
- From the navigation bar, select User & Account
 and then select Account Details.
 -
On the Account Details page, select the Insights Settings tab.
The Insights Settings tab is only available if your account is subscribed to Insights and you are an Organization Administrator. To check to see if you have a Insights subscription, click Insights in the navigation pane. If you see visual graphs, then you are subscribed.
-
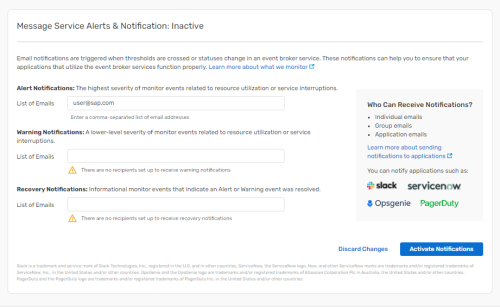
In the Message Service Alerts & Notification:Inactive tile, you can specify the type of alerts that are received for Alert, Warning, and Recovery notifications.
For each field, you can type up to five emails (with each email delimited by a comma) in the List of emails for notifications for each type of notification, and then click Activate Notifications.

If you need to disable notifications or change the email addresses to which the emails are sent, see Disabling Notifications for Your Account and Changing the Emails for Your Account, respectively.
Changing the Emails for Your Account
Email notifications are sent to up to five emails and you can configure which notifications are sent to which emails. The email addresses you enter can be the same email those used for your
Follow these steps to change the email addresses to send email notifications to:
-
Log in to the Cloud Console if you have not done so yet. The URL to access the Cloud Console differs based on your
- On the navigation bar, select User & Account and then select Account Details.
-
On the Account Details page, select the Insights Settings tab.
The Insights Settings tab is only available if your account is subscribed to Insights and you are an Organization Administrator. To check to see if you have a Insights subscription, click Insights in the navigation pane. If you see visual graphs, then you are subscribed.
- In the Message Service Alerts & Notification:Active tile, add or remove emails in the List of emails for notifications field for Alert, Warning, and Recovery Notifications fields, and then click Update Notifications.
Notifications emails are now sent to the emails that you have added and no emails are no longer sent to the email addresses that you removed.
Disabling Notifications for Your Account
You can disable notifications for your account so that emails are no longer sent. You must have an Insights subscription, and be an Organization Administrator to perform this procedure.
To disable notification emails, follow these steps:
-
Log in to the Cloud Console if you have not done so yet. The URL to access the Cloud Console differs based on your
- On the navigation bar, select User & Account and then select Account Details.
-
On the Account Details page, select the Insights Settings tab.
The Insights Settings tab is only available if your account is subscribed to Insights and you are an Organization Administrator. To check to see if you have a Insights subscription, click Insights in the navigation pane. If you see visual graphs, then you are subscribed.
- In the Message Service Alerts & Notification:Active tile, click Deactivate Notifications, and in the Deactivate Notifications dialog, click Deactivate.
Notification emails are no longer sent. To enable notification emails again, you must enable it for your account. For more information , see Enabling Notifications for Your Account.
Viewing the Log Retention Period
By default, logs from the event broker services are retained for 30 days in Datadog to help in analyzing, debugging, or troubleshooting your applications. Insights currently pulls in the System.log and command.log files from the event broker services. Metrics are maintained based on the Datadog retention policy specified on the Datadog website. You must have an Insights subscription, and be an Organization Administrator to perform this procedure.
If you require the logs to be retained for a longer time for additional requirements, such as security, contact SAP to request an increase of up to 90 days.
To see the current log retention time for your services, follow these steps:
-
Log in to the Cloud Console if you have not done so yet. The URL to access the Cloud Console differs based on your
- On the navigation bar, select User & Account and then select Account Details.
-
On the Account Details page, select the Insights Setting tab and you'll see the log retention time in the Logs Retention tile.
The Insights Settings tab is only available if your account is subscribed to Insights and you are an Organization Administrator. To check to see if you have a Insights subscription, click Insights in the navigation pane. If you see visual graphs, then you are subscribed.
Integrating Notifications with Applications
You can integrate notifications from Insights with various third-party notification-based applications, such as service desk, incident management, or incident response applications.
These integrations are currently possible if there is email integration available in the notification-based application. Email notification integration is a common workflow that is used to leverage notifications with notification-based applications to drive actions (or workflows) within an organization. For example, the email notifications can be used to create service tickets, manage user notifications (i.e., capture volumes of notifications to reduce notification fatigue or drive notice and escalation workflows).
The typical high-level workflow to integrate with email notifications with a notification-based application is as follows:
- Get a target email address from the notification-based application and add it to the list of emails in the Cloud Console. For more information, see Enabling Notifications for Your Account.
- Within the notification-based application, configure how the emails are treated and the workflow that is triggered based on the email notification.
For example, these notification-based platforms have information about how to integrate emails that are received to trigger workflows and actions: