A common practice when developing and deploying applications in a cloud environment is to bring up a cloud resource using the cloud provider’s APIs, use that resource, then remove it when testing is complete. Since this is all accomplished programmatically, there is no need to manually start or stop the resources with the cloud provider’s user interface.
For example, a common flow for testing an application would be to:
- Bring up a cloud server (for example, AWS EC2) programmatically.
- Install and test the app on that cloud server.
- Tear down the cloud server when your testing is complete.
Likewise, with
This tutorial shows you how to:
- Use an API token to create an event broker service via the
advanced event mesh REST API. For more information, see Creating an Event Broker Service Using the REST API.
- Use the REST API to configure select an the message spool size for an existing event broker service, For more information, see Configuring the Message Spool Size Using the REST API
- Use the REST API to configure the cluster name for an existing event broker service. For more information, see Configuring the Cluster Name Using the REST API
- Use the REST API to configure connection endpoints and ports for Kubernetes based event broker services. For more information, see Configuring Connection Endpoints and Ports for Kubernetes-based Event Broker Service Using the REST API.
- Use the RES API to create connection endpoints and ports for Kubernetes based event broker services. For more information, see Creating Connection Endpoints and Ports for Kubernetes-based Event Broker Service Using the REST API.
- Use the REST API to update an cluster name for an existing event broker service. For more information, see Changing the Cluster Name for an Existing Event Broker Service Using the REST API.
- Use the REST API to update an existing event broker service with a hostname. For more information, see Configuring Hostnames Using the REST API.
- Use the REST APIs to get connection details for the new event broker service. For more information, see Getting the Connection Details for the Event Broker Service Using the REST API.
- Use the REST APIs to get a retrieve connection endpoint URL templates from an event broker service. For more information, see Retrieving Connection Endpoint URL Templates from an Event Broker Service.
- Use the REST API to edit connection endpoints for an existing Kubernetes based event broker service. For more information, see Editing Connection Endpoints Using REST API for Kubernetes-Based Event Broker Service.
- Use the REST API to delete the service. You must have the permission enabled for your API token. For more information, see Deleting an Event Broker Service.
Before you Begin
You can start this tutorial, you'll require the following:
- An account with advanced event mesh and an event broker service.
- Your account must be assigned the Administrator or Mission Control Manager role.
- An API token must be available in the account with at least the following permissions:
- Either the Get My Services with Management Credentials or Get Services with Viewer Credentials permission (both are recommended for this tutorial)
- Create Services
- Delete Services
- Get Cluster Information
- Update Cluster Name
- Update Services
- Delete My Service Connection Endpoints
- Create Service Connection Endpoints
- Update Service Connection Endpoints
- Delete Service Connection Endpoints
-
A way to send REST messages from your development environment. We use Postman in this tutorial. You can use the Solace Blogs – Create Messaging Service Postman collection and click the Run in Postman button to import the collection to Postman, which permits you to easily work through the steps in this tutorial.
At this time, the documentation on the Solace Blogs is similar to the advanced event mesh for SAP Integration Suite REST API but may be out of date. The examples described here can be used with advanced event mesh by simply changing the URL described in the examples from https://api.solace.cloud/api/v0/ to https://api.solace.cloud/api/v0/. Refer to the documentation on this website for instructions about using the REST API for advanced event mesh.
After you've set up the environment in Postman to use your API token, you can simply make each call by specifying the REST API. To check that API token is set up correctly to use Bearer authorization in Postman, select the Headers tab to validate that it is using Bearer Authorization and set it to use the
apiTokenenvironment variable that you had set up earlier. For example, you can see that Authorization is set up to use Bearer and theapiTokenin the following illustration:
For more information, see Creating an API Token.

Creating an Event Broker Service Using the REST API
You can use the advanced event mesh REST API to create a default high-availability, or
- You fill must provide values for the following name-value pairs:
name—a unique name for the serviceserviceTypeId—the type of service to create such asdeveloperorenterpriseserviceClassId—with the class of the service, such asdeveloperorenterprise-kilo.The table below lists the service classes and their correspondingServiceClassId
Service Class ServiceClassId developer Enterprise 250 enterprise-250-nano Enterprise 1K enterprise-kilo Enterprise 5K enterprise-mega Enterprise 10K enterprise-giga Enterprise 50K enterprise-tera Enterprise 100K enterprise-100k-tera - Ensure that the API token you are using has been granted the permission
Create Servicesto permit you to create an event broker service. - You cannot create more event broker services than what your account permits and this API call may fail if you have reached the limit for your account.
If your account has the permissions, you can optionally specify the message spool size up to 6TB using the messagingStorage option when creating a service. To specify the message spool storage size, enter messagingStorage: {number} in the body of the of the payload, replacing {number} with a value between the base value of the class (see Configuring Message Spool Sizes) and 6000. To enable this feature, contact SAP.
Follow these steps to create an event broker service.
-
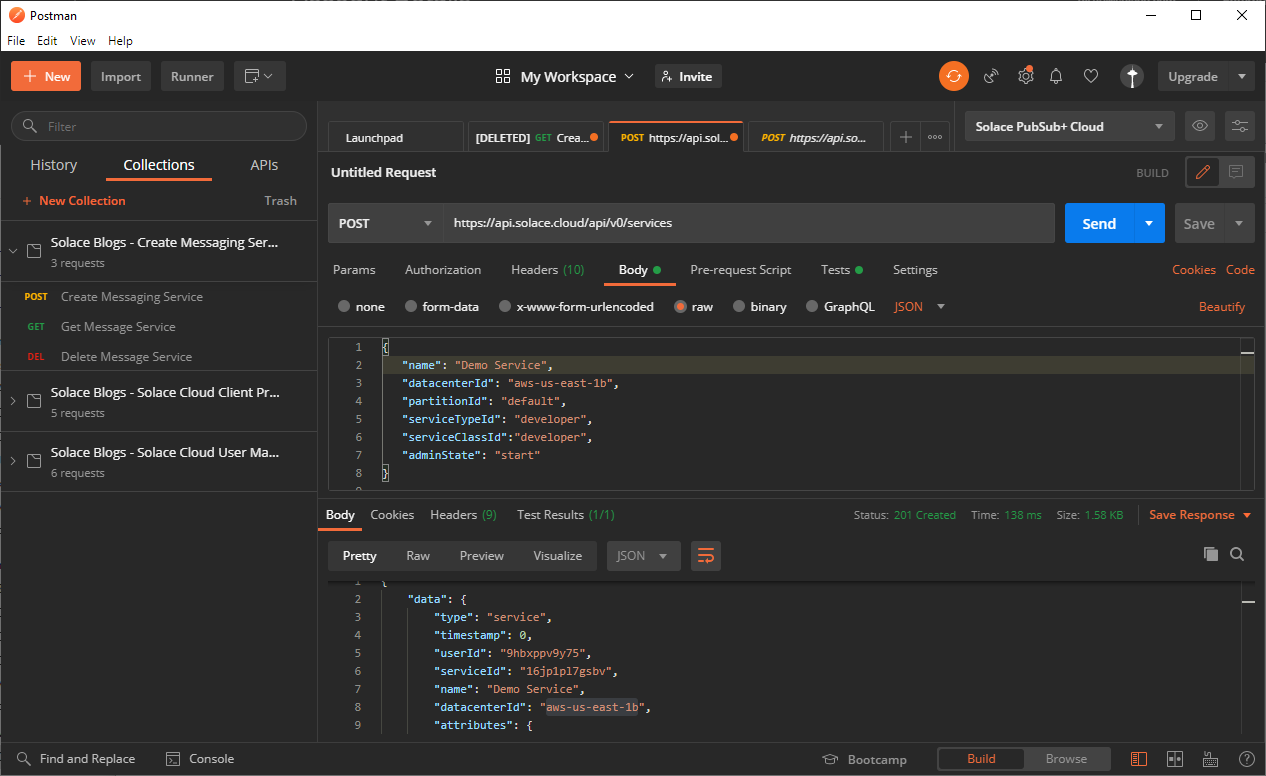
In the Solace Blogs – Create Messaging Service Postman Collection, select the POST Create Messaging Service request.
The POST request would be to the URL,
https://api.solace.cloud/api/v0/services. - For the POST command, fill the Body with the following information:
- The
nameobject is pre-filled asDemo Service. You can use a different name here if you want. - The
{{datacenterId}}to name of the data center. For this example, we'll set it toeks-us-east-2a. serviceTypeIdandserviceClassId:developer
- The
- Click Send. You should see a response that shows that service was created like the following illustration:
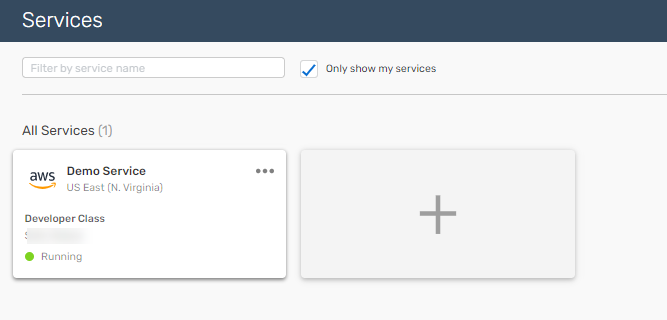
- A service takes a few minutes to create so wait a few minutes, and then go back to the Cloud Console and in Cluster Manager, you should see your event broker service.
You have successfully created an event broker service. In the response is a serviceId, you may want to add this as variable or make it note of it for future commands. To add the {{service variable}}, click Environment quick look (eye icon) to specify the {{serviceId}} variable with the value of the serviceId from the response. You can also use optional parameters when you create your service to do the following:
- Create a service with a specific event broker version. For more information, see Selecting the Event Broker Service Version Using the REST API.
- Specify the Message Spool size. For more information, see Configuring the Message Spool Size Using the REST API.
- Set the cluster name. For more information, see Configuring the Cluster Name Using the REST API.
- Create a service with the connection endpoint with ports configured. Connection endpoints can either be public or private endpoints. For more information about public and private endpoints, see Connection Endpoint Considerations and Configuring Connection Endpoints and Ports for Event Broker Services.
To configure a service with connection endpoint ports configured using REST API, see Configuring Connection Endpoints and Ports for Kubernetes-based Event Broker Service Using the REST API
Selecting the Event Broker Service Version Using the REST API
You can choose the event broker service version to use when creating an event broker service using the REST API. To do this, use POST to https://api.solace.cloud/api/v0/services with the optional attribute of eventBrokerVersion to create the service. A successful response returns 201 (Created), otherwise one of the following responses are returned with a subcode (if applicable):
400—a bad request occurred for the following reason:5000_102—an unsupported version was specified.- Suggested resolution: Issue a GET to
https://api.solace.cloud/api/v0/eventBrokerVersionswith the parametersserviceClassIdanddcIdset whereserviceClassIdis the service class anddcIdis datacenter id. For example, runninghttps://api.solace.cloud/api/v0/eventBrokerVersions?serviceClassId=developer&dcId=eks-us-east-2agives the following list of versions:{ "data": [ { "versionId": "10.1", "defaultVersion": true, "portRemappingEnabled": true, "redundancyGroupSslEnabled": false, "portDisablingEnabled": true } ] } - The returned information is:
versionId: The version that can be used to create the service.defaultVersion: Whether the specified version is the default version.isPortDisablingEnabled: Whether the event broker version supports port disabling.isPortRemappingEnabled: Whether the event broker version supports port remapping.isRedundancyGroupSslEnabled: Whether theversion supports encrypted High-Availability (HA) links.
- Suggested resolution: Issue a GET to
For example, the following JSON is for a REST API call to create a service with an event broker service version of 10.1:
{
  "name": "myfirstservice",
  "serviceTypeId": "enterprise",
  "serviceClassId": "enterprise-kilo",
  "adminState": "start",
  "datacenterId": "azure-eastus2",
  "eventBrokerVersion": "10.1"
}
Configuring the Message Spool Size Using the REST API
You can configure the message spool size using the advanced event mesh REST API. To do this, use a POST to https://api.solace.cloud/api/v0/services with the optional attribute of messageStorage to create the service. It's important to note that after you've set the limit, it cannot be changed. For information about creating a service using the REST API, see Creating an Event Broker Service Using the REST API.
For example, the following JSON is for a REST API call to create a service with a Message Spool Size of 700 GB:
{
  "name": "myfirstservice",
  "serviceTypeId": "enterprise",
  "serviceClassId": "enterprise-kilo",
  "adminState": "start",
  "datacenterId": "google-eastus2",
  "eventBrokerVersion": "10.1"
  "messagingStorage": 700
}
A successful response returns 201.
Modify the Message Spool Size of an Event Broker Service Using the REST API
Message spool sizes of up to 6TB are possible as an add-on feature for all event broker service versions with the appropriate account permissions, and event broker service version 10.0 and later running in Kubernetes 1.23 or later cluster.
You should note the following:
- The ability to scale the message spool size is not enabled by default. To enable it, you must contact SAP.
- Specifications related to scalable message spool sizing, including availability and implementation can vary by cloud provider. Consult your cloud providers Kubernetes and storage related documentation for specifications.
- While possible, scaling message spool sizes above 4TB for an event broker service in an Azure Kuberenetes cluster is not currently fully supported. If you require scaling above 4TB and you encounter issues, contact SAP for support.
- Scale up of the message spool storage size is not supported for the
- Message spool size can only be scaled up. Scaling down is not possible.
- To perform this operation, you must know the
infrastructureIdfor the event broker service whose message spool size you want to scale. TheinfrastructureIdis listed under thedatasection in the body of a response to aGETevent broker service request. See Getting the Connection Details for the Event Broker Service Using the REST API
To scale up the message spool size use a POST call to https://api.solace.cloud/api/v1/infrastructures/{infrastructureId}/requests/scaleUpInfrastructure with the data parameter infrastructureId as the infrastructureId of the event broker service whose message spool size you want to scale up, with the following payload in the body:
{
	"requestedSpoolSize": {number}
}
The requestSpoolSize parameter must be a number ranging from 10 to 800 (6000 with appropriate account permissions and event broker service 10.0 or later in a Kubernetes 1.23 or later cluster) in increments of 1. Be aware that using a number lower than the current spool size will cause the POST to fail. You can see the current spool size of the service you want to scale up by performing a GET (see Getting the Connection Details for the Event Broker Service Using the REST API) and looking at the Storage attribute in the serviceClassDisplayedAttributes section of the response.
"serviceClassDisplayedAttributes":
        "Storage": "50 GB"
A successful POST returns a code of 202 Accepted with the response containing a message similar to the following:
{
       "data": {
        	"id": "77h28m4kbej",
        	"creationTimestamp": 1666903921206,
        	"serviceClassId": "enterprise-250-nano",
        	"requestedSpoolSize": 105,
        	"type": "scaleUpInfrastructure"
        	}
}
You can use the id in the response to query the status of the scale up spool size request, see Getting the Status to a Scale Message Spool Size Request Using the REST API.
Once the increase in message spool size is complete, you must update the size of your queues in the Broker Manager so they utilize the new storage space, see Creating Your First Queue for information.
The following error responses and codes can be returned, with some possible solutions:
400—a bad request occurred for one of the following reasons:- the requested spool size is invalid—the requested spool size may be to high, or it is below the existing spool size.
- Suggested resolution—review the existing message spool size, and try a different number.
- another job is in progress
- Suggested resolution—the service may already be scaling up its message spool size. Wait several minutes and retry the request.
- the requested spool size is invalid—the requested spool size may be to high, or it is below the existing spool size.
404—the specified event broker service not found- Suggested resolution — check that the event broker service has been created and that the
infrastructureIdis correct.
- Suggested resolution — check that the event broker service has been created and that the
Getting the Status to a Scale Message Spool Size Request Using the REST API
You can get the status of a scale message spool size request using the REST API. To get the status to a scale message spool size request, use a GET call to https://api.solace.cloud/api/v0/infrastructures/{infrastructureId}/requests/{requestId} where the infrastructureId parameter is the infrastructureId used original scale up spool size POST request, and where the requestId parameter is the Id that was returned in the 202 Accepted response to that request.
A successful GET returns a 200 OK with a response containing a message similar to the following:
"data":
	{
	 "id": "98mcm4zzoaa",
	 "creationTimestamp": 1667303594827,
	 "adminProgress": "inProgress",
	 "serviceClassId": "enterprise-250-nano",
	 "requestedSpoolSize": 50,
	 "type": "scaleUpInfrastructure"
	}
the adminProgress parameter displays the following states for the original POST request:
-
inProgress: The request in progress. -
completed: The request is complete. -
failed: The request failed.
Checking Whether Message Spool Size Expansion is Available for Event Broker Service Using the REST API
You can test the ability to scale the message spool size for your Kubernetes-based event broker service in customer-controlled datacenters using the REST API. Note that ability to scale the message spool size is not enabled by default. To enable it, you must contact SAP.
To test a customer-controlled datacenters ability to scale up message spool size, use a POST to https://api.solace.cloud/api/v0/{datacenterId}/requests/testSpoolSizeScaleUp with the data parameter datacenterId as the datacenterId of the datacenter you want to test the message spool size scaling on. To acquire the datacenterId, see Getting Datacenter Information Using the REST API.
A successful POST returns a code of 202 Accepted with an empty response payload. The test takes a period of time to run; its results will be available in the response to a GET call for datacenter information (see Getting Datacenter Information Using the REST API), and will appear similar to the following:
    ],
	...
	"spoolScaleUpCapability": "SUPPORTED",
	"spoolScaleUpTestTimestamp": "2022-10-28T13:32:50Z",
	"spoolScaleUpTestMessage": "Spool size scale up test passed",
	...
	},
The spoolScaleUpCapability parameter displays the results of a test, and has the following values:
UKNOWN: Testing has not been run. The status of this feature is unknown; run the test.IN_PROGRESS: Testing is in progress.SUPPORTED: Testing has succeeded and scaling up is available.NOT_SUPPORTED: Testing has failed and scaling is not supported.
Potential failed responses to the GET include:
404—the specified datacenter could not be found.- Suggested resolution—check that the
datacenterIdis correct, and that you are not trying to run the test on a public datacenter.
- Suggested resolution—check that the
Getting Datacenter Information Using the REST API
You can acquire information about your datacenters using REST API. This provides you with the DatacenterID you need to run the scale message spool size test for customer-controlled datacenters, as well as the results of that test.
To get datacenter information perform a GET to https://api.solace.cloud/api/v0/datacenters.
A successful GET returns a code of 200 OK with the response containing details about available datacenters.
- If you are looking for the
datacenterId, you will find it in the response listed as"id"similar to the following in the response:
	"id": "myregion-aws-us-central1",
	 "type": "datacenter",
	 "name": "",
	 "displayName": "Private AWS Datacenter",
- If you are looking for test results for scaling of message spool size, you will see something similar to the following in the response:
    ],
	...
	"spoolScaleUpCapability": "SUPPORTED",
	"spoolScaleUpTestTimestamp": "2022-10-28T13:32:50Z",
	"spoolScaleUpTestMessage": "Spool size scale up test passed",
	...
	},
Configuring the Cluster Name Using the REST API
To create a DMR cluster, each event broker service in the cluster must have the same cluster name. You can configure the cluster name for a service using the advanced event mesh REST API to set up your DMR cluster. To do this, use a POST to https://api.solace.cloud/api/v0/services with the optional attribute of clusterName to create the service. A valid name is 1 to 64 characters long and can contain only alphanumeric characters, dashes, and underscores.
After you have set up your event broker services to have the same cluster name and you're ready to create the DMR cluster. To start this, contact contact SAP as the ability to create the DMR cluster is not yet available.
A successful response returns 201 (Created), otherwise one of the following responses are returned with a subcode (if applicable):
400—with a support code of102, which indicates that an invalid request was made. The reason it failed is for one or more of the following reasons:- the cluster name specified was not 1 to 64 characters in length
- the cluster name specified has characters other than alphanumeric, dashes, or underscores
- the version for
eventBrokerVersionthat was selected is not supported
Creating an event broker service with a custom cluster name is supported for Kubernetes for Virtual Private Cloud/Virtual Network (VPC/VNet) and on-premises deployments, including Google Cloud, Customer-Controlled Regions, and Dedicated Regions. This call currently can't be used in AWS or Azure public regions.
For example, the following JSON is for a POST call to https://api.solace.cloud/api/v0/services for creating a service with a cluster name of My-First-Cluster:
{
	"name": "service-1",
	"serviceTypeId": "developer",
	"serviceClassId": "developer",
	"adminState": "start",
	"redundancyGroupSslEnabled": true,
	"msgVpnName": "service-1",
	"cluster": {
		"name": "My-First-Cluster"
  	},
	"datacenterId": "gke-gcp-us-east1",
	"eventBrokerVersion": "10.1",
	"partitionId": "default",
	"attributes": {
		"customizedMessagingPorts": {
			"serviceAmqpPlainTextListenPort": 0,
			"serviceAmqpTlsListenPort": 5671,
			"serviceMqttPlainTextListenPort": 0,
			"serviceMqttTlsListenPort": 8883,
			"serviceMqttTlsWebSocketListenPort": 8443,
			"serviceMqttWebSocketListenPort": 0,
			"serviceRestIncomingPlainTextListenPort": 0,
			"serviceRestIncomingTlsListenPort": 9443,
			"serviceSmfPlainTextListenPort": 0,
			"serviceSmfCompressedListenPort": 0,
			"serviceSmfTlsListenPort": 55443,
			"serviceWebPlainTextListenPort": 0,
			"serviceWebTlsListenPort": 443
		}
	}
}
Configuring Connection Endpoints and Ports for Kubernetes-based Event Broker Service Using the REST API
When creating Kubernetes-based Event broker service service, you can configure service connection endpoints at the same time. To do this, use a POST to https://api.solace.cloud/api/v0/services with the optional attribute of serviceConnectionEndpoints.
When doing so, you must specify the following mandatory values:
Name—can contain any text, and must be 1 and 50 characters in length.Description—can contain any text, and can be between 0 and 50 characters in length.accessType—must be set to either"public"or"private".type—must be set to either"nodeport"or"loadbalancer".
The following JSON example shows a REST API call to create a service named My-First-Service with various service connection endpoint ports defined under serviceConnectionEndpoints value:
{
	"type": "service",
	"timestamp": 0,
	"name": "My-First-Service",
	"datacenterId": "gke-gcp-us-central1-a",
	"eventBrokerVersion": "10.1",
	"msgVpnName": "My-First-Service",
	"redundancyGroupSslEnabled": true,
	"serviceTypeId": "developer",
	"serviceClassId": "developer",
	"adminState": "start",
	"partitionId": "default",
	"serviceConnectionEndpoints": [
		{
		"name": "Public Endpoint",
		"description": "",
		"accessType": "public",
		"type": "loadbalancer",
		"ports": {
			"serviceSmfPlainTextListenPort": 0,
			"serviceSmfCompressedListenPort": 0,
			"serviceSmfTlsListenPort": 55443,
			"serviceWebPlainTextListenPort": 0,
			"serviceWebTlsListenPort": 443,
			"serviceAmqpPlainTextListenPort": 0,
			"serviceAmqpTlsListenPort": 5671,
			"serviceMqttPlainTextListenPort": 0,
			"serviceMqttWebSocketListenPort": 0,
			"serviceMqttTlsListenPort": 8883,
			"serviceMqttTlsWebSocketListenPort": 8443,
			"serviceRestIncomingPlainTextListenPort": 0,
			"serviceRestIncomingTlsListenPort": 9443,
			"serviceManagementTlsListenPort": 943,
			"managementSshTlsListenPort": 22
			}
		}
		]
}
You can change the values in serviceConnectionEndpoints value of the JSON above based on the criteria list below:
- There is a maximum of one public and one private connection endpoint.
- Only the protocols listed in the code example above are allowed.
- You can enter a value for any port in the list, with the following limitations:
- At least one port must be enabled.
- Port values can range from 0 to 65534.
- You can use ports 22 and 943 as custom ports.
- If you are using NodePort as part of your deployment for Customer-Controlled Regions, the port numbers are generated and therefore can't be changed. For NodePort deployments, only private endpoints can be used.
- The values for each port must be unique. Duplicating values will cause the POST to fail.
- Setting a port value to 0 or not listing a port implies it is disabled.
- The following reserved port values can not be used: 5550, 8080, 8300, 8301, 8302, 8741
- The connection endpoints require both
serviceSmfTlsListenPortandserviceManagementTlsListenPortports enabled (not set to 0), but both do not have to be on the same endpoint, see the list of parameters below for details: - One endpoint must have the Secured SMF port enabled, which is required for messaging with client applications and for inter-broker communication in an event mesh.
- One endpoint must have the Secured Broker Management Host (SEMP) port; the SEMP port is required to manage your event broker service.
- If you have both private and public endpoints, you don't need to enable the Secured SMF and SEMP ports on the same endpoint, but we recommend that you choose the private endpoint for the SEMP port.
A successful POST returns a 201 (Created) with the response containing a message similar to the following:
{
	"data": {
	"type": "service",
	"timestamp": 0,
	"userId": "28hn3x03t66",
	"serviceId": "y4y003ixeud",
	"name": "My-First-Service",
	"msgVpnName": "My-First-Service",
	...
	 <snip>
	...
	"serviceConnectionEndpoints": []
	}
}
The following should be noted:
- If the
serviceConnectionEndpointssection is missing and the legacycustomizedMessagingPortssection is instead specified, a default connection endpoint is created with the customized messaging ports, with the additions of SEMP and SMF, TLS and SSH. - If the entire
serviceConnectionEndpointsandcustomizedMessagingPortssections are not provided a connection endpoint is created with default secure (TLS) ports enabled.
Creating Connection Endpoints and Ports for Kubernetes-based Event Broker Service Using the REST API
You can create service connection endpoints for an existing kubernetes-based event broker service service. To do this, use a POST to https://api.solace.cloud/api/v0/serviceConnectionEndpoints.
When doing so, you must specify the following mandatory values:
serviceId—the ID for the service you want to add connection endpoints to, see Getting the Connection Details for the Event Broker Service Using the REST APIName—can contain any text, and must be 1 and 50 characters in length.Description—can contain any text, and can be between 0 and 50 characters in length.accessType—must be set to eitherpublicorprivate.type—must be set to eithernodeport"orloadbalancer.
The following JSON example shows a REST API call to create public endpoint connections on an event broker service with the serviceId of 30b53ks8azm. The various service connection endpoint ports are defined under the serviceConnectionEndpoints value:
{
	"serviceId": "30b53ks8azm"
       "serviceConnectionEndpoints": [
		{
		"name": "Private Endpoint",
		"description": "",
		"accessType": "Private",
		"type": "loadbalancer",
		"ports": {
			"serviceSmfPlainTextListenPort": 0,
			"serviceSmfCompressedListenPort": 0,
			"serviceSmfTlsListenPort": 55442,
			"serviceWebPlainTextListenPort": 0,
			"serviceWebTlsListenPort": 442,
			"serviceAmqpPlainTextListenPort": 0,
			"serviceAmqpTlsListenPort": 5671,
			"serviceMqttPlainTextListenPort": 0,
			"serviceMqttWebSocketListenPort": 0,
			"serviceMqttTlsListenPort": 8883,
			"serviceMqttTlsWebSocketListenPort": 8443,
			"serviceRestIncomingPlainTextListenPort": 0,
			"serviceRestIncomingTlsListenPort": 9442,
			"serviceManagementTlsListenPort": 942,
			"managementSshTlsListenPort": 21
			}
		}
		]
}
You can change the values in serviceConnectionEndpoints value of the JSON above based on the criteria list below:
- There is a maximum of one public and one private connection endpoint. If the POST attempts to create connection endpoints of a type that already exist, it will be denied.
- Only the protocols listed in the code example above are allowed.
- You can enter a value for any port in the list, with the following limitations:
- At least one port must be enabled.
- Port values can range from 0 to 65534.
- You can use ports 22 and 943 as custom ports.
- If you are using NodePort as part of your deployment for Customer-Controlled Regions, the port numbers are generated and therefore can't be changed. For NodePort deployments, only private endpoints can be used.
- The values for each port must be unique. Duplicating values will cause the POST to fail.
- Setting a port value to 0 or not listing a port implies it is disabled.
- The following reserved port values can not be used: 5550, 8080, 8300, 8301, 8302, 8741
- The connection endpoints require both
serviceSmfTlsListenPortandserviceManagementTlsListenPortports enabled (not set to 0), but both do not have to be on the same endpoint, see the list of parameters below for details: - One endpoint must have the Secured SMF port enabled, which is required for messaging with client applications and for inter-broker communication in an event mesh.
- One endpoint must have the Secured Broker Management Host (SEMP) port; the SEMP port is required to manage your event broker service.
- If you have both private and public endpoints, you don't need to enable the Secured SMF and SEMP ports on the same endpoint, but we recommend that you choose the private endpoint for the SEMP port.
A successful POST returns a 202 (Accepted) with the response containing a message similar to the following:
{
       "id": "8iq2n1t9v50",
	"job": null,
	"serviceId": "30b53ks8azm",
	"requestType": "serviceConnectionEndpointRequest",
	"creationTimestamp": 0,
	"requestAttributes": {
		"serviceWebPlainTextListenPort": "0",
		"serviceRestIncomingTlsListenPort": "9442",
		"serviceManagementTlsListenPort": "942",
		"serviceAmqpPlainTextListenPort": "0",
		"description": "",
		"serviceMqttWebSocketListenPort": "0",
		"serviceWebTlsListenPort": "442",
		"serviceRestIncomingPlainTextListenPort": "0",
		"type": "LoadBalancer",
		"serviceSmfCompressedListenPort": "0",
		"accessType": "Public",
		"serviceMqttPlainTextListenPort": "0",
		"serviceSmfPlainTextListenPort": "0",
		"serviceAmqpTlsListenPort": "5671",
		"serviceMqttTlsListenPort": "8882",
		"serviceSmfTlsListenPort": "55442",
		"name": "Public Endpoint",
		"serviceMqttTlsWebSocketListenPort": "8443",
		"managementSshTlsListenPort": "21",
		"operation": "create"
	}
}
The POST call is asynchronous. You can use the id in the response to look up the status of the request by calling https://api.solace.cloud/api/v0/services/{service id}/requests/{id}
Changing the Cluster Name for an Existing Event Broker Service Using the REST API
You may have an existing event broker services that you want to add to an DMR cluster. To start this, you must change the current cluster name to match the cluster name for another service. You can change the cluster name using the advanced event mesh REST API provided your API Token has at least the following permissions:
- Get Cluster Information
- Update Cluster Name
An event broker service cluster name can be changed if the following conditions are specified:
- The event broker service whose cluster name is being changed is not part of an event mesh. If it is, that event broker service must first be removed from the event mesh.
- The new cluster name specified is 1 to 64 characters in length and contains only alphanumeric characters, dashes, or underscores.
The following is a suggested work flow to change the cluster name for an event broker service
- (Optional) Determine if the cluster name can be edited. For more information, see Determining Whether the Cluster Name for an Event Broker Service Can Be Edited.
- (Optional) Determine what existing cluster names are available for use in the account. For more information, see Getting the Cluster Names Available Using the REST API.
- Edit the cluster name using either a new name or an existing name. For more information, see Editing the Cluster Name for an Existing Event Broker Service. You can also use the same call from the previous step to validate that your cluster name was created for the service.
Determining Whether the Cluster Name for an Event Broker Service Can Be Edited
The cluster name for an event broker service can be changed only if there are no pre-existing DMR external links are configured on the event broker service- in other words, it isn't part of an event mesh.
To validate, issue a GET to https://api.solace.cloud/api/v0/admin/infrastructures/{infrastructureid}/clusterInfo. A response that is returned that indicates whether the cluster name can be edited in the supportsClusterRename property. A value of true indicates that it can be changed, while a value of false indicates it cannot. When it is false, it indicates that there are DMR external links configured on the service.
To determine the value for {infrastructureId}, issue a GET response to the event broker service using its service identifier and from the response get the infrastructureId. For example, a GET https://api.solace.cloud/api/v0/services/de472ut2xic and from the response, the infrastructureId is u9bs2tiij8e . For more information getting information about getting information about an event broker service, see Getting the Connection Details for the Event Broker Service Using the REST API.
Note to make this call, you must set Solace Element Management Protocol (SEMP) over Message Bus to Enabled. This is enabled from the service details page in the Cloud Console on the Manage tab > Advanced Options for an event broker service.
For example, a GET response https://api.solace.cloud/api/v0/admin/infrastructures/u9bs2tiij8e/clusterInfo returns the following response to indicate that it is possible to edit the existing cluster name for the specified infrastructureId. A successul operations returns a response status of 200:
{
    "infrastructureId": "u9bs2tiij8e",
    "infrastructureName": "nano-daily-dev-u9bs2tiij8e",
    "infrastructure": {
        "supportsClusterRename": true
    },
    "errorMessage": null,
    "type": "infrastructureClusterInfo",
    "id": "u9bs2tiij8e"
}
Editing the Cluster Name for an Existing Event Broker Service
You can edit the cluster name, provided the cluster name is considered editable. Though not necessary, it is possible to determine whether the cluster is editable prior to attempting to do it. For more information, see Determining Whether the Cluster Name for an Event Broker Service Can Be Edited.
You can specify a new name or using a pre-existing cluster name. You can get the list of pre-existing cluster name available in the account if you want. For more information about how to do this, see Getting the Cluster Names Available Using the REST API.
To edit the name of the cluster for an event broker service, POST to https://api.solace.cloud/api/v0/infrastructures/{infrastructureid}/requests/dmrClusterNameUpdateRequests and set dmrClusterName in the body of the request to cluster name you want. To determine the {infrastructureId}, issue a GET response to the event broker service. For more information getting information about a service, see Getting the Connection Details for the Event Broker Service Using the REST API.
For example, for the infrastructureid of u9bs2tiij8e, issue the POST request https://api.solace.cloud/api/v0/infrastructures/u9bs2tiij8e/requests/dmrClusterNameUpdateRequests with the following payload in the body:
{
  "dmrClusterName" : "MyFirstCluster"
}
A successful response returns 202 (Created), otherwise a 400 response is returned to indicate that the cluster name was not changed.
Here's what a successful response looks like, where dmrClusterName specifies the new cluster name:
{
  "data": {
  "id": "c98m7382xht",
  "creationTimestamp": 1630688550818,
  "dmrClusterName": "MyFirstCluster",
  "type": "dmrClusterNameUpdateRequest"
  }
}
Getting the Cluster Names Available Using the REST API
You can get the cluster names available for an account. This might be useful so you can identify an existing cluster name to which to set your event broker service.
To determine the cluster names available, issue a GET to https://api.solace.cloud/api/v0/serviceClusterNames?detail=true (for detailed information about the cluster names and event broker services using that cluster name) or https://api.solace.cloud/api/v0/serviceClusterNames?detail=false (for a simple the list of the cluster names).
For example:
{
  "data": [
  {
    "clusterName": "MyFirstCluster",
    "serviceNames": [
                     "My-Second-Service",
                     "My-First-Service"
                    ],
    "type": "clusterNames"
  },
  {
    "clusterName": "cluster-gke-gcp-us-central1-a-p9fqu5ymy3i",
    "serviceNames": [
                     "My-Third-Service"
			        ],
			"type": "clusterNames"
  }
  ],
  "meta": {
           "currentTime": 1630689531325,
           "pageNumber": 0,
           "pages": {
              "next-page": null,
              "total-pages": 1
           },
           "count": 3,
           "pageSize": 100
          }
   }
  }
}
Configuring Hostnames Using the REST API
You can configure hostnames for an existing event broker service using the advanced event mesh REST API and the service identifier of the event broker service. The service identifier is part of the response returned when you create an event broker service or retrieved via a GET. For information about creating an event broker service or retrieving the service identifier using the REST API, see Creating an Event Broker Service Using the REST API and Getting the Connection Details for the Event Broker Service Using the REST API, respectively.
Operations to configure a hostname occur asynchronously. For this reason, you may see a delay before the operation completes. Using the REST API, you can perform the following operations to configure hostnames on an event broker service:
- Add a hostname to an existing event broker service
- Add additional hostnames to endpoints on an existing event broker service
- Update additional endpoint hostnames on an existing event broker service
- Delete a hostname from an existing event broker service
- Delete additional endpoint hostnames from an existing event broker service
To add, move, or delete a hostname for event broker services you own or in your organization, you require an API token with the Update Service permission under My Services and Organization Services, respectively. For more information about API tokens, see Managing API Tokens.
For information about managing event broker services using the REST API, see Managing Services with the SAP Integration Suite, Advanced Event Mesh REST API.
Adding a Hostname Using the REST API
You can add a hostname using the REST API to an existing event broker service.
To perform this operation, you must know the service identifier for your event broker service.
To add a hostname to an existing event broker service, use a POST call to https://api.solace.cloud/api/v0/services/{service_id}/serviceHostNames with the data parameters serviceHostName as the hostname and operation as create. A successful response returns 202 (Accepted), otherwise one of the following responses are returned with a subcode (if applicable):
400—a bad request occurred for one of the following reasons:5000_5800—the specified hostname is already being used for an event broker service- Suggested resolution—specify a different hostname
5000_5802—the event broker service already has five additional hostnames configured- Suggested resolution — the maximum number of hostnames has already been configured; you can remove an existing hostname and try again
5000_5803—the hostname that was specified cannot be longer than 255 charactersSuggested resolution — the maximum number of hostnames has already been configured; you can remove an existing hostname and try again
404—the specified event broker service does not exist- Suggested resolution — check that the event broker service has been created and that the
service_idis correct
- Suggested resolution — check that the event broker service has been created and that the
For example, the following JSON shows a REST API call to create the hostname, mytesthostname:
{  "serviceHostName": "mytesthostname",
   "operation": "create"
}
Here's an example of a successful 202 response:
{
  "id": "24iadhksu1",
  "job": null,
  "serviceId": "24iadhkfzh",
  "requestType": "serviceHostNameRequest",
  "creationTimestamp": 1608069258621,
  "requestAttributes":
  {
    "serviceHostName": "mytesthostname",
    "operation": "create"
  }
}
To access the event broker service, you can use mytesthostname.messaging.solace.com as a hostname.
Adding Additional Hostnames to Connection Endpoints Using the REST API for an Event Broker Service
You can create additional hostnames on existing connection endpoints only on Kubernetes-based event broker service using the REST API. You can specify up to five additional hostnames per event broker service in this way. It also allows you to specify different hostnames based on public or private connectivity type. Doing this permits multiple client applications to connect to the same service.
To create additional hostnames, you will need the serviceConnectionEndpointId for the event broker service, see Getting the Connection Details for the Event Broker Service Using the REST API for details.
To create a hostname on an existing service connection endpoint, use a POST call to https://api.solace.cloud/api/v0/serviceConnectionEndpoints/{serviceConnectionEndpointId}/serviceHostNames/serviceHostName as the hostname and the operation as create.
The following JSON example shows a REST API call to create the hostname for an endpoint on testapiservice:
{
   "serviceHostName": "testapiservice",
   "operation": "create"
}
A successful response to your call returns a 202 (Accepted), otherwise one of the following responses may be returned with a subcode (if applicable):
500—(Internal Server Error) a bad request occurred for one of the following reasons:5000_5800—the specified hostname is already being used- Suggested resolution—specify a different hostname
5000_5802—the event broker service already has five additional hostnames configured- Suggested resolution—the maximum number of hostnames has already been configured; you can remove an existing hostname and try again
5000_5803—the hostname that was specified cannot be longer than 255 characters- Suggested resolution—the maximum number of hostnames has already been configured; you can remove an existing hostname and try again
404—the specified event broker service or service connection endpoint does not exist- Suggested resolution—check that the event broker service has been created and that the
service_idorserviceConnectionEndpointIdis correct
- Suggested resolution—check that the event broker service has been created and that the
Here's an example of a successful 202 response to our example above:
{
	"id": "o02ejztmja0",
	"job": null,
	"serviceId": "0tkmieag38e",
	"requestType": "serviceHostNameRequest",
	"creationTimestamp": 1650990377391,
	"requestAttributes": {
		"serviceHostName": "testapiservice",
		"serviceConnectionEndpointId": "nfk1n4sb9k9",
		"operation": "create"
	}
}
Updating Additional Hostnames for Connection Endpoints Using the REST API for an Event Broker Service
You can update the additional hostnames for the connection endpoints on an Kubernetes-based event broker service using REST API.
To update the hostname, you will need the serviceConnectionEndpointId for the event broker service. See Getting the Connection Details for the Event Broker Service Using the REST API for details.
To update hostnames, use a POST call to https://api.solace.cloud/api/v0/serviceConnectionEndpoints/serviceConnectionEndpointId/serviceHostNames/ with the data parameters serviceHostName as the hostname of the service to move, and the operation as update.
The following JSON example shows a REST API call to update the hostname to testapiservice:
{
  "serviceHostName": "testapiservice",
  "operation": "update"
}
A successful response will return a 202 (Accepted), otherwise one of the following responses will be returned with a subcode (if applicable):
500—(Internal Server Error) a bad request occurred for one of the following reasons:5000_5801—the hostname is not being applied to a service.- Suggested resolution — specify a different hostname
404—the specified event broker service or service connection endpoint does not exist- Suggested resolution — check that the event broker service has been created and that the
service_idorserviceConnectionEndpointIdis correct
- Suggested resolution — check that the event broker service has been created and that the
Here's an example of a successful 202 response:
{
	"id": "nbcgrr6zo9p",
	"job": null,
	"serviceId": "0tkmieag38e",
	"requestType": "serviceHostNameRequest",
	"creationTimestamp": 1650999473614,
	"requestAttributes": {
		"serviceHostName": "testapiservice",
		"serviceConnectionEndpointId": "nfk1n4sb9k9",
		"operation": "update"
	}
}
Deleting a Hostname from an Event Broker Service Using the REST API
You can remove a hostname from an event broker service. To perform this operation, you must know the service identifier for your event broker service. It's important to understand that you cannot remove the default name that's assigned to the event broker service. For information about retrieving the service identifier using the REST API, see Getting the Connection Details for the Event Broker Service Using the REST API.
To remove a hostname from an event broker service, use a DELETE call to https://api.solace.cloud/api/v0/services/{service_id}/serviceHostNames with the data parameters serviceHostName as the hostname to delete and operation as delete.. A successful response returns 202 (Accepted), otherwise the following response is returned:
404—the specified event broker service or specified hostname for the event broker service doesn't exist- Suggested resolution—check that event broker service exists or the hostname exists on the specified event broker service.
For example, the following JSON is for a REST API call to delete the hostname of mytesthostname:
{  "serviceHostName": "mytesthostname",
   "operation": "delete"
}
Here's an example of a successful 202 response:
{
  "id": "24iadhkgu1",
  "job": null,
  "serviceId": "24iadhkfzh",
  "requestType": "serviceHostNameRequest",
  "creationTimestamp": 1608069258621,
  "requestAttributes":
  {
    "serviceHostName": "mytesthostname",
    "operation": "delete"
  }
}.
Deleting Additional Hostnames from Connection Endpoints Using the REST API for an Event Broker Service
You can delete additional hostnames for existing connection endpoint on an Kubernetes-based event broker service using REST API. To delete additional hostnames, you will need the serviceConnectionEndpointId for the event broker service. See Getting the Connection Details for the Event Broker Service Using the REST API for details.
To delete a hostname on an service connection endpoint, use a POST call to https://api.solace.cloud/api/v0/serviceConnectionEndpoints/{serviceConnectionEndpointId}/serviceHostNames with the data parameters serviceHostName as the hostname and operation as DELETE.
The following JSON example shows a REST API call to delete the hostname testapiservice:
{
  "serviceHostName": "testapiservice",
  "operation": "delete"
}
A successful response returns a 202 (Accepted), otherwise the following responses may be returned:
404—the specified event broker service or service connection endpoint, or hostname does not exist- Suggested resolution—check that the event broker service has been created and that the
service_id,serviceConnectionEndpointId, andhostnameare correct
- Suggested resolution—check that the event broker service has been created and that the
Here's an example of a successful 202 response to our example above:
{
	"id": "9j3e95xnevi",
	"job": null,
	"serviceId": "0tkmieag38e",
	"requestType": "serviceHostNameRequest",
	"creationTimestamp": 1650993634873,
	"requestAttributes": {
		"serviceHostName": "testapiservice",
		"serviceConnectionEndpointId": "nfk1n4sb9k9",
		"operation": "delete"
	}
}
Getting the Connection Details for the Event Broker Service Using the REST API
After you have created an event broker service, you can use the advanced event mesh REST API to retrieve the service's connection details.
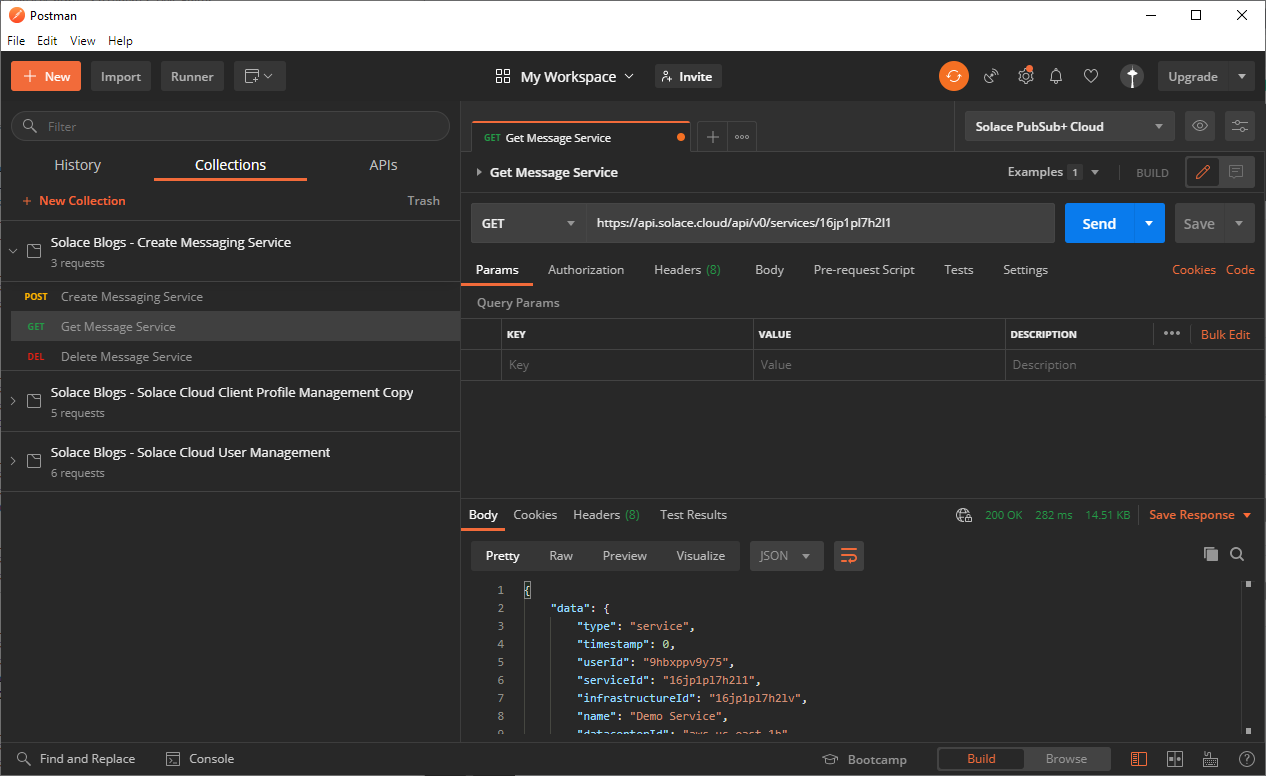
- In the
https://api.solace.cloud/api/v0/services/{serviceid}. - In the GET request URL, replace the
{serviceId}variable with the identifier of the service you want to see. If you don't provide the specific{serviceId}, you can get all the services that you are permitted to see (i.e., issue aGETtohttps://api.solace.cloud/api/v0/services). - Click Send.
You should see the connection details in the response.
- Note that if you are looking for the
serviceConnectionEndpointIdit is located at the end of the response as shown in the following code snippet:{ "data": { "type": "service", "timestamp": 0, "userId": "28hn3x03t66", "serviceId": "0tkmieag38e", ... <snip> ... "serviceConnectionEndpoints": [ { "serviceConnectionEndpointId": "nfk1n4sb9k9", "name": "Public Endpoint", "description": "", ... <snip> ...
Retrieving Connection Endpoint URL Templates from an Event Broker Service
Event broker services can have numerous connection endpoints and multiple hostnames for each. To simplify the management of these URLs, SAP provides URL templates within the body of a response to a GET for an event broker services connection details. Using the URL template, and information within the response, you can create the URLs for your hostnames on connection endpoints for the following:
-
messagingProtocols -
managementProtocols -
serviceConnectionEndpoints
To construct an URL using the template, perform a GET to retrieve details of the event broker service as outlined in Getting the Connection Details for the Event Broker Service Using the REST API. In the body of the response, look for protocolUrlTemplate for the protocol you want an URL for. The protocolUrlTemplate provides details on how to construct the URL, and the information you need to populate it. It appears similar to the example below:
"protocolUrlTemplate": {
        "template": "https://{host}:{port}",
        "protocolName": "serviceRestIncomingTlsListenPort"
For example, to construct an URL for the Secured REST messaging protocol, you would look for something similar to the following in the response body:
...
<snip>
...
"messagingProtocols": [
	...
	<snip>
	...
		"name": "REST",
		...
		<snip>
		...
		"endPoints": [
			...
			<snip>
			...
			{
			"name": "Secured REST",
			"transport": "HTTPS",
			"uris": [
				"https://mr-connection-c86ikbkijlu.messaging.solace.cloud:9443"
			],
			"secured": "yes",
			"compressed": "no",
			"protocolUrlTemplate": {
				"template": "https://{host}:{port}",
				"protocolName": "serviceRestIncomingTlsListenPort"
			}
		}
	...
	<snip>
	...
In the example above, the template indicates that the URL is constructed in this format: https://{host}:{port}. The host and port information are located towards the end of the response body, in serviceConnectionEndpoints section, as follows:
...
<snip>
...
"serviceConnectionEndpoints": [
	{
		"serviceConnectionEndpointId": "c86ikbkijlu",
		"name": "Public Endpoint",
		"description": "",
		"accessType": "public",
		"type": "LoadBalancer",
		"k8sServiceId": "nano-daily-dev-c86ikbkijlu-solace",
		"hostNames": [
			"mr-connection-c86ikbkijlu.messaging.solace.cloud"
		],
		"ports": {
			"serviceWebPlainTextListenPort": 0,
			"serviceRestIncomingTlsListenPort": 9443,
			"serviceManagementTlsListenPort": 943,
			"serviceAmqpPlainTextListenPort": 0,
			"serviceMqttWebSocketListenPort": 0,
			"serviceWebTlsListenPort": 443,
			"serviceRestIncomingPlainTextListenPort": 9000,
			"serviceSmfCompressedListenPort": 0,
			"serviceMqttPlainTextListenPort": 0,
			"serviceSmfPlainTextListenPort": 0,
			"serviceMqttTlsListenPort": 8883,
			"serviceAmqpTlsListenPort": 5671,
			"serviceSmfTlsListenPort": 55443,
			"serviceMqttTlsWebSocketListenPort": 8443,
			"managementSshTlsListenPort": 0
		}
	}
...
<snip>
...
In this situation, the hostNames is mr-connection-c86ikbkijlu.messaging.solace.cloud and the protocolName is serviceRestIncomingTlsListenPort which has a value of 9443. Replacing the {host} and {port} values in the template provides the URL which is: https://mr-connection-c86ikbkijlu.messaging.solace.cloud:9443
Editing Connection Endpoints Using REST API for Kubernetes-Based Event Broker Service
You can edit the connection endpoint ports of an existing Kubernetes-based event broker service using REST API.
To edit the ports you will need the serviceConnectionEndpointID for the event broker service, which will be included in the response to a GET for an event broker service, see Getting the Connection Details for the Event Broker Service Using the REST API for details.
To edit a port for an existing service, use a PUT call to https://api.solace.cloud/api/v0/serviceConnectionEndpoints/{serviceConnectionEndpointId} and use the following JSON in the in the body of the PUT:
{
"serviceConnectionEndpoint": {
	"name": "PrivateEndpoint",
	"description": "",
	"ports": {
	"serviceSmfPlainTextListenPort": 0,
	"serviceSmfCompressedListenPort": 0,
	"serviceSmfTlsListenPort": 55443,
	"serviceWebPlainTextListenPort": 0,
	"serviceWebTlsListenPort": 0,
	"serviceAmqpPlainTextListenPort": 0,
	"serviceAmqpTlsListenPort": 0,
	"serviceMqttPlainTextListenPort": 0,
	"serviceMqttWebSocketListenPort": 0,
	"serviceMqttTlsListenPort": 0,
	"serviceMqttTlsWebSocketListenPort": 0,
	"serviceRestIncomingPlainTextListenPort": 0,
	"serviceRestIncomingTlsListenPort": 0,
	"serviceManagementTlsListenPort": 943,
	"managementSshTlsListenPort": 0
	}
   }
}
You changes the values in the JSON above based on the criteria in the list below:
- The
NameandDescriptionvalues can contain any text, but must be between 0 and 50 characters in length. If these values are left unspecified, no changes will be made to them. - At least one port must be enabled.
- You can enter a value for any port in the list, with the following limitations:
- Port values can range from 0 to 65534.
- A value of 0 indicates that the port is disabled.
- If no value is specified when making the PUT, the corresponding port will remain unchanged.
- The values entered must be unique, duplicating values in the port fields will cause the PUT to fail.
- The following values are reserved, and can not be used: 5550, 8080, 8300, 8301, 8302, 8741
A successful PUT returns a code of 202 with the response containing a message similar to the following:
{
	"id": "c5kd80ff8qw",
	"job": null,
	"serviceId": "5b6p7b7lvxg",
	"requestType": "serviceConnectionEndpointRequest",
	"creationTimestamp": 0,
	"requestAttributes": {
		"serviceWebPlainTextListenPort": "0",
		"serviceRestIncomingTlsListenPort": "0",
		"serviceManagementTlsListenPort": "943",
		"serviceAmqpPlainTextListenPort": "0",
		"serviceMqttWebSocketListenPort": "0",
		"serviceWebTlsListenPort": "0",
		"serviceRestIncomingPlainTextListenPort": "0",
		"type": "LoadBalancer",
		"serviceSmfCompressedListenPort": "0",
		"accessType": "Private",
		"serviceMqttPlainTextListenPort": "0",
		"serviceSmfPlainTextListenPort": "0",
		"serviceAmqpTlsListenPort": "0",
		"serviceMqttTlsListenPort": "0",
		"serviceSmfTlsListenPort": "55443",
		"name": "Private Endpoint",
		"serviceMqttTlsWebSocketListenPort": "0",
		"managementSshTlsListenPort": "0",
		"description": "",
		"operation": "create"
		}
}
You can use the id provided in the response to look up the status of the asynchronous request by using a PUT call to https://api.solace.cloud/api/v0/services/{service_id}/requests/{id}.
For example, using data in the response above, you would use a PUT call to https://api.solace.cloud/api/v0/5b6p7b7lvxg/requests/c5kd80ff8qw
Deleting Connection Endpoints for Kubernetes-Based Event Broker Service
You can use the advanced event mesh REST API to delete connection endpoints on an Kubernetes-based event broker service.
To delete the connection endpoints you will need the serviceConnectionEndpointID for the event broker service, which will be included in the response to a GET for an event broker service, see Getting the Connection Details for the Event Broker Service Using the REST API for details.
To delete service connection endpoints on an event broker service, use a DELETE call to https://api.solace.cloud/api/v0/serviceConnectionEndpoints/{serviceConnectionEndpointId} the following constraints on the DELETE call should be noted:
- The last service connection endpoint cannot be deleted.
- The service connection endpoint that is providing
serviceSmfTlsListenPortorserviceManagementTlsListenPortcannot be deleted.
A successful DELETE will return a code of 202 with the response containing a message similar to the following:
{
	"id": "c70z4rbxydr",
	"job": null,
	"serviceId": "5b6p7b7lvxg",
	"requestType": "serviceConnectionEndpointRequest",
	"creationTimestamp": 0,
	"requestAttributes": {
	    "serviceConnectionEndpointId": "n5qyikaqwlq",
	    "operation": "delete"
	    }
}
The DELETE call is asynchronous. You can use the id in the response to look up the status of the request by calling https://api.solace.cloud/api/v0/services/{service id}/requests/{id}
Deleting an Event Broker Service
You can use the advanced event mesh REST API to delete an event broker service. Follow these steps to delete an event broker service.
- In the Solace Blogs – Create Messaging Service Postman Collection, select the DEL Delete Messaging Service request . The DELETE request would be to the URL,
https://api.solace.cloud/api/v0/services/{serviceid}. - In the DELETE request URL, replace the
{serviceId}variable with the identifier of the service you want to delete. - Click Send.

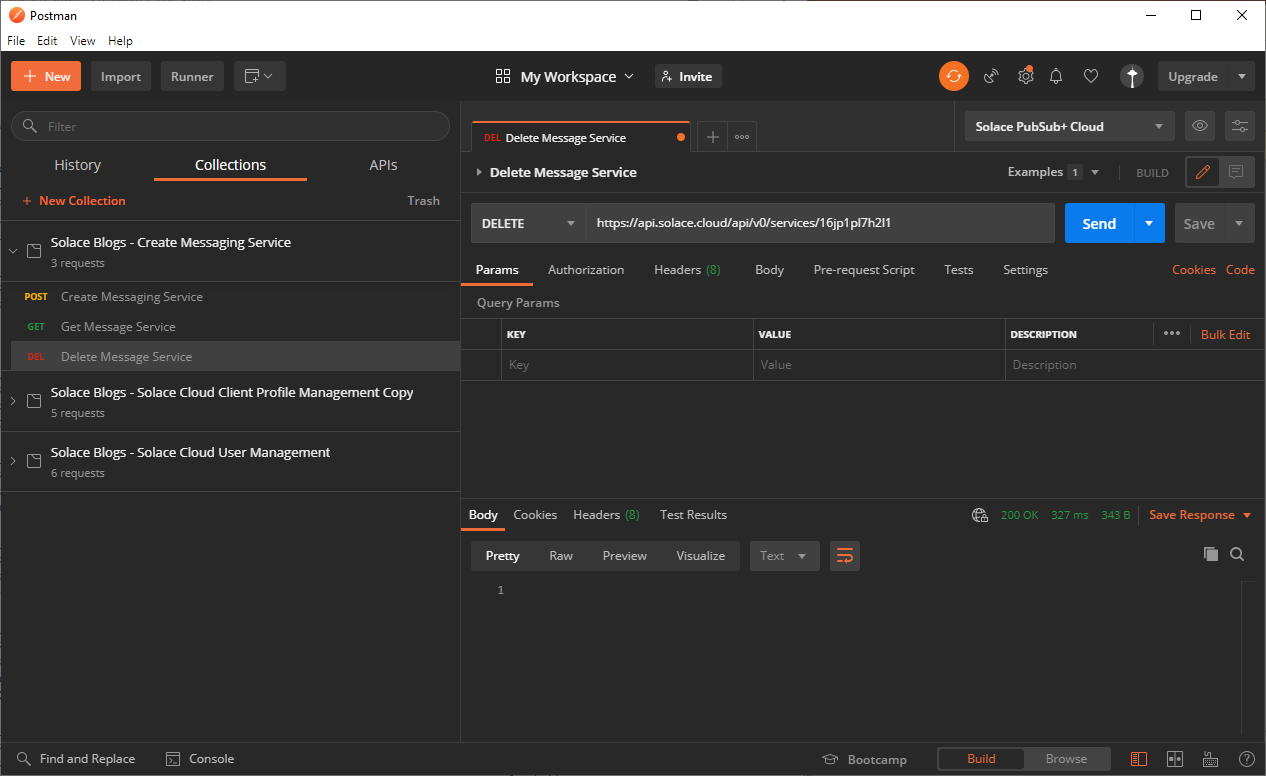
You should see a 200 OK response that indicates that the request was successful. Go back to the Cloud Console and in Cluster Manager,you should no longer see the service you delete or if you run a Get Service REST call, you will get a "Could not find service {serviceID} in your organization {organizationID}" message.