Application domains enable you to subdivide your event-driven architecture (EDA) into related, manageable pieces. You can create application domains that represent different lines of business, development teams, microservice applications, or any other logical categories that makes sense in your EDA, and then manage applications, events, schemas, and enumerations within the domains. For each application domain you can also specify one or more topic domains to define where the events in the application domain fit into your overall topic structure. You can also control who has access to view, manage, and edit each application domain.
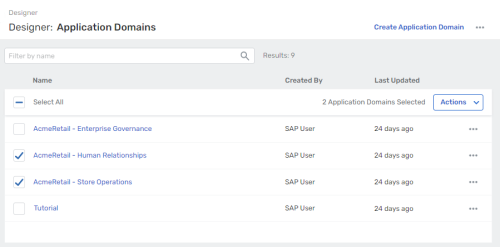
When you open Designer, you see the list of application domains for your organization.
This section includes the following tasks:
- Viewing the List of Application Domains
- Configuring User Access to Application Domains
- Creating an Application Domain
- Updating an Application Domain
- Moving Objects Between Application Domains
- Exporting and Importing Application Domains
- Deleting an Application Domain
You can also create custom attributes for application domains. For more information, see Using Custom Attributes
To help you get started, SAP provides sample application domains that you can download from GitHub and import into Designer. For more information, see Sample Application Domains.
Viewing the List of Application Domains
When you open Designer, you see the list of application domains for your organization.
To return to the list of application domains from any page in Designer, perform one of the following actions:
-
Click Designer in the breadcrumb
 at the top of the page.
 -
On the navigation bar, select Designer
 .
.
Configuring User Access to Application Domains
The level of access you have to an application domain depends on the role you're assigned in advanced event mesh and the permissions granted to that role.
- Event Portal Users
- Advanced event mesh users with the Event Portal User role have limited access and viewing capabilities. They can't open an application domain unless they are granted access by someone with Manager level access to the application domain. The following application domain access levels can be granted to users with the Event Portal User role:
- Application Domain Viewer
- Event Portal Users with Viewer access to an application domain can perform these functions:
- View the objects (applications, events, schemas, enumerations, event APIs, and Event API Products) in the application domain
- Download the AsyncAPI document for applications and event APIs in the application domain
- Application Domain Editor
- Event Portal Users with Editor access to an application domain perform the same functions as users with Viewer access. They can also create, update, and delete objects in the application domain.
- Application Domain Manager
- Event Portal Users with Manager access to an application domain can perform the same functions as users with Editor access. They can also perform these functions:
- Change an object's version state
- Modify the application domain information, including name, description, and topic domains
- Add and delete custom attributes in the application domain
- Give users with the Event Portal User role access to the application domain
- Event Portal Managers
- Advanced event mesh users with the Event Portal Manager role have full access to all Event Portal capabilities in Designer, Catalog, and Runtime Event Manager. They also have application domain Manager level access to all application domains.
- Administrators
- Advanced event mesh users with the Administrator role have full access to all advanced event mesh capabilities. Administrators can assign users any role in advanced event mesh for SAP Integration Suite. In Event Portal, Administrators have the same access as Event Portal Managers.
For more information about assigning user roles for advanced event mesh, see Managing Users, Roles, and Permissions.
The following table explains the scope of each role and access level:
| Role | Administrator | Event Portal Manager | Event Portal User with Manager Access | Event Portal User with Editor Access | Event Portal User with Viewer Access |
|---|---|---|---|---|---|
| Scope of Operation | advanced event mesh | Event Portal | Application Domain | ||
|
Assign Event Portal Manager and Event Portal User roles |
|
|
|
|
|
|
View Event Portal users and roles |
|
|
|
|
|
|
Assign application domain access to users with the Event Portal User role |
|
|
|
|
|
|
Designer screen access |
|
|
|
|
|
|
Create and delete custom attributes |
|
|
Limited access1 |
|
|
|
Export and import application domains |
|
|
|
|
|
|
Enable deletion protection for application domains |
|
|
|
|
|
|
Runtime Event Manager screen access |
|
|
|
|
|
|
Catalog screen access |
|
|
Limited access2 |
Limited access2 |
Limited access2 |
- Custom attributes for individual application domains only. Event Portal Users with Manager level access can't create and delete custom attributes that apply to all application domains.
- Information displayed is limited to shared events, shared schemas, and application domains with Manager or Editor level access.
Setting User Access for an Application Domain
If you have Manager level access to an application domain, you can give users with the Event Portal User role access to the application domain. Users with Administrator or Event Portal Manager roles can't be assigned an access level for an application domain because they already have full access to all application domains.
To give Event Portal Users access to an application domain, perform these steps:
- When creating or viewing an application domain, click More Actions
 and then select Set User Access.
 -
Click Add.
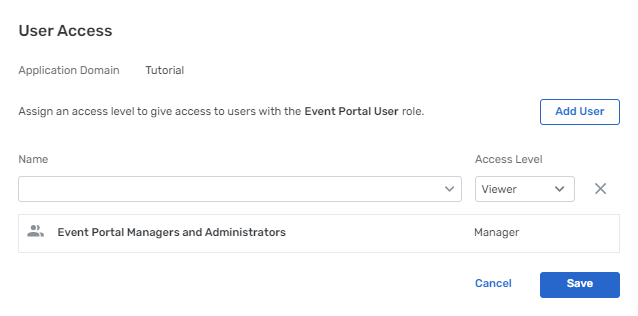
- In the Name list, type or select the name of the user you want to give access to. Only users with the Event Portal User role whom you have not already set an access level for appear in the list.
- Select the Access Level that you want to give to the user.
- Repeat steps 2-4 to give access to another user.
- To remove access from a user with the Event Portal User role, click Remove
 in the row for the user or user group.
 - Click Save.
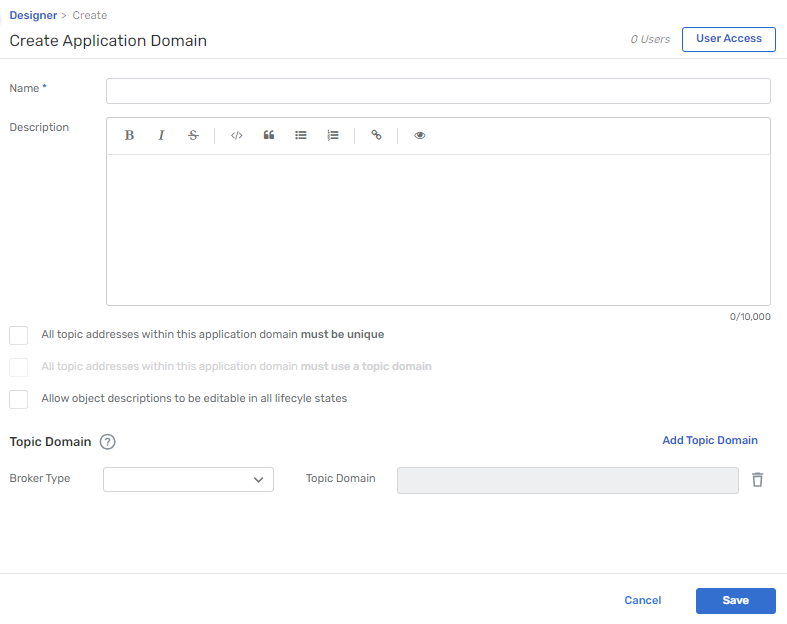
Creating an Application Domain
When you create an application domain, you specify the properties of the application domain, including the topic domains and requirements for topic addresses for events that reside in the domain. For more information about topic domains and addresses, see Topic Addresses. You can also specify who has access to the application domain.
To create an application domain, perform these steps:
-
In Designer, above the list of application domains, click Create Application Domain.

- Enter a Name and Description for the application domain. The Description field supports Markdown. Click toggle preview
 to preview the rendered text.
 - If you want each event in the application domain to have a unique topic address, select All topic addresses within this application domain must be unique.
- To specify a topic domain, click Add Topic Domain and perform these steps:
- Select the Broker Type for the topic domain.
- Enter the topic domain. Topic domains for Solace event brokers must meet the following conditions; For more information, see Topic Addresses.
- Don't use the *, >, or ! characters in a topic address.
- To use an enumeration variable, type an opening brace {, click Configure Variable, and select an enumeration and version. Enumerations are supported only in Solace topic domains.
- If you want every event topic address to start with one of the application domain's topic domains, select All topic addresses within this application domain must use a topic domain. This option is available only after you have specified at least one topic domain.
- If you want to allow updates to the descriptions of object versions that are not in Draft state, select Allow object descriptions to be editable in all lifecycle states.
- (Optional) Add a value for any custom attributes that have been set up in your organization.
- (Optional) Click User Access to give Viewer, Editor, or Manager level access to users with the Event Portal User role. For more information, see Configuring User Access to Application Domains.
- Click Save.
Updating an Application Domain
After you create an application domain you can add Applications, Event API Products, Event APIs,Events, Schemas, and Enumerations to the application domain. You can also update the name, description, custom attributes, and topic domain settings.
If All topic addresses within this application domain must use a topic domain is selected and you change a topic domain, any events that use the topic domain do not update automatically. The next time you edit an event you'll have to update the topic address in the event before you can save it.
To update an application domain, perform these steps:
- On the Application Domains page, select the application domain that you want to update.
- Click More Actionsfor the application domain and select Edit.
- Update the settings as necessary.
- Click Save.
Moving Objects Between Application Domains
You can move applications, events, schemas, and enumerations from one application domain to another if you have at least Editor access to both the source and destination application domains. Moving objects is useful to reorganize your resources or to make corrections if you import objects into the wrong application domain.
When you move objects that reference or are referenced by other objects in the same application domain, any affected objects that are not shared will be changed to shared to allow all references to be maintained across application domains.
If you move an object with a value set for a custom attribute, the value is maintained and the custom attribute is added to the destination application domain if it doesn't already exist. For more information, see Using Custom Attributes
To move objects to another application domain, perform these steps:
- On the Application Domains page, select the application domain that contains the objects you want to move.
- Select the Applications, Events, Schemas, or Enumerations tab.
- Select the check boxes next to the objects that you want to move.
- Click the Actions drop-down list and select Move Object-type.
- Select the Destination Application Domain.
- (Optional) In the message that appears when the move is complete, click Go to Application Domain to open the destination application domain.
Exporting and Importing Application Domains
You can export application domains from your organization's account and import application domains into your account. Exported application domains includes all objects in the application domain. The exported file is in JSON format and can be a maximum of 10 MB. Custom attributes that apply to all application domains are not included in the export file.
You must have the Administrator or Event Portal Manager role to export or import application domains.
Exporting Application Domains
When you export an application domain, if any objects reference shared objects from other application domains, the application domains that contain the referenced objects are also included in the export file. You can select a single application domain or multiple application domains to export.
To export application domains, perform these steps:
-
On the Application Domains page, select the application domains that you want to export.
- Perform one of the following actions:
- In the Actions drop-down list at the top of the list of application domains, select Export.
- If you selected only one application domain, click More Actionsfor the application domain and select Export Application Domain.
- (Optional) Edit the Export Filename.
- Review the details of the application domains to be included in the export.
- Click Export.
Importing Application Domains
When you import application domains, the application domains and all of the objects they contain are added to Event Portal. The import file must meet the following requirements:
- Each application domain in the file must have a unique name. If an application domain with the same name already exists in your account, the import fails. You can rename an application domain in the JSON file and try the import again.
- If the application domain includes Kafka topic domains or topic addresses that use a Kafka delimeter, the delimiter must match the delimiter specified in the account you are importing to.
- The import file must be smaller than 10 MB.
You can download sample application domains from GitHub and import them into Designer. For more information, see Sample Application Domains
To import an application domain, perform these steps:
- On the Application Domains page, click More Actions.
- Select Import Application Domains.
- Select the JSON file to import.
- Click Open.
The import may take several minutes.
Deleting an Application Domain
You can delete application domains from Event Portal if no objects are in an environment, and if no objects are referenced by objects in other application domains.
To delete an application domain, perform one of these steps:
- On the Application Domains page, click More Actions for the application domain and select Delete.
- In the graph or list view for the application domain, click More Actions in the top-right corner and select Delete.
If one or more object associations blocks you from deleting an application domain, an error message provides more information.
Protecting Application Domains From Deletion
Administrators and Event Portal Managers can enable deletion protection for an application domain to prevent it from being deleted. If deletion protection in enabled for an application domain, the Delete option is disabled.
To enable deletion protection for an application domain, perform these steps:
- On the Application Domains page, click More Actions for the application domain and select Edit.
- In the top-right corner, click More Actions and select Enable Deletion Protection.